

How To Turn On Diagnostics Policy Service Windows 10

Equally you might be aware, there are a number of active background processes and services that contribute to the shine functioning of Windows. Most of these background processes/services employ a minimal amount of CPU power and RAM. Although, sometimes a process may malfunction or be rendered corrupt and end up utilizing fashion more than resource than usual, leaving little for other foreground applications. The Diagnostic Policy Service is 1 such process notorious for hogging up the system resource on rare occasions.
The Diagnostic Policy Service is one of the shared processes of Svchost.exe (Service Host) and is responsible for detecting issues with various Windows components and also troubleshooting them. The service tries to automatically fix any detected bug if possible and if not, log the diagnostic data for assay. Since diagnosis and automatic troubleshooting of problems is an important feature for a seamless experience, the Diagnostic Policy Service has been gear up to automatically start when the figurer boots on and stay active in the background. The exact reason behind it consuming more CPU ability than intended isn't known only based on the potential solutions, the culprits may be a corrupt instance of the service, corrupt arrangement files, a virus or malware assail, large outcome log files, etc.
In this article, we have explained five different methods that volition help you bring downwards the CPU consumption of the Diagnostic Policy Service back to normal.

Prepare Service Host: Diagnostic Policy Service High CPU Usage
Potential fixes for Diagnostic Policy Service High CPU Usage
Virtually users will be able to solve the unusually loftier disk usage of the Diagnostic Policy Service by simply restarting it. Others might need to perform a few scans (SFC and DISM) to look for corrupt system files or run the born performance troubleshooter. Updating to the latest version of Windows and clearing event viewer logs can also resolve the issue. Finally, if zilch seems to work, users have the option to disable the service. Still, disabling the Diagnostic Policy Service implies that Windows will no longer carry out machine-diagnosis and resolve errors.
Method ane: End the Process from Task Director
A procedure may grunter up additional system resources if something prompted a corrupt instance of it. In that case, you can try manually terminating the process (Diagnostic Policy Service here) and so allowing information technology to automatically restart. All of this tin exist achieved from the Windows Task Managing director (Kill Resource Intensive Processes with Windows Task Manager).
1. Right-click on the Starting time menu button and select Task Director.

2. Click on More than Details to aggrandize Task Manager and have a look at all the currently agile processes & services.

three. Locate the Service Host: Diagnostic Policy Service nether Windows processes. Correct-click on information technology and select End job. (You can also select the service by left-click and then click on the Finish Task push button at the bottom correct.)

The Diagnostic Policy Service volition restart automatically, although if information technology doesn't, but restart your computer and bank check if the upshot persists.
Method 2: Run SFC and DISM scan
A recent Windows system update or even an antivirus attack may have corrupted certain organisation files resulting in high CPU usage of the Diagnostic Policy Service. Fortunately, Windows has built-in utilities to scan for and repair corrupted/missing system files. The offset one is the System File Checker utility and as the proper name suggests, information technology checks the integrity of all system files and replaces the cleaved ones with a cached re-create. If an SFC scan fails to fix corrupted system files, users can utilise the Deployment Image Servicing and Direction (DISM) command-line tool.
1. Type Control Prompt in the Windows search bar and click on Run as Administrator in the right panel when search results get in.

2. Blazon sfc /scannow in the Command Prompt window and press enter to execute. The scan may take a while so sit back and exercise not close the window until the verification process reaches 100%.

three. Later on completing the SFC scan, execute the following DISM control. Again, wait patiently for the scan and restoring process to end earlier exiting the application. Restart the computer when done.
DISM /Online /Cleanup-Image /RestoreHealth

Besides Read: How to Fix High CPU Usage past Organisation Idle Process
Method 3: Update Windows and Run the Performance Troubleshooter
Every bit mentioned before, a recent Windows update can also be the culprit behind the abnormal behaviour of the Diagnostic Policy Service. You can try rolling back to the previous update or look for any new updates pushed by Microsoft rectifying the error. If yous are facing any problems while updating Windows, run the built-in update troubleshooter.
Apart from updating Windows, as well run the System Performance troubleshooter to scan for whatever performance issues and have them fixed automatically.
1. Press the Windows key + I simultaneously to launch the System Settings then click on Update & Security settings.
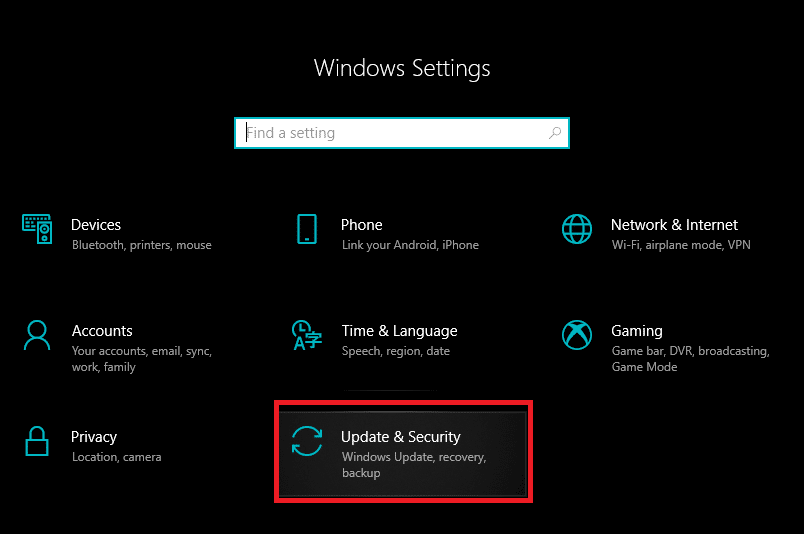
ii. On the Windows Update tab, click on Bank check For Updates. The application will start looking for any available updates and automatically offset downloading them. Restart your computer in one case the new update has been installed.

3. Bank check if the Diagnostic Policy Service is all the same hogging upwardly your system resources and if it is, and so run the Update troubleshooter. Open up Update & Security settings over again and motility to the Troubleshoot tab and then Click on Additional Troubleshooters.

4. Nether the Get upwardly and running section, click on Windows Update to view the available options and and so click on the ensuing Run the troubleshooter button. Follow the on-screen instructions and go through the troubleshooting procedure.
To run the System Performance troubleshooter:
1. Blazon Control Panel in the Commencement Search bar and printing Enter to open the same.

2. Click on Troubleshooting.

three. Under System and Security, click on the Run maintenance tasks hyperlink.

4. On the following window, click on Advanced and check the box next to Apply repairs automatically. Click on Next to run the troubleshooter.

Likewise Read: Prepare Desktop Window Manager High CPU (DWM.exe)
Method 4: Clear the Event Viewer log
The Outcome Viewer program maintains a record of all the application and system mistake messages, warnings, etc. These event logs tin build up to a considerable size and prompt issues for the Service Host process. Simply clearing the logs can aid resolve issues with the Diagnostic Policy Service. We recommend you clear the event viewer logs regularly to avert any future issues.
1. Launch the Run command box by pressing Windows key + R, type eventvwr.msc and click on Ok to open up the Outcome Viewer awarding.

ii. On the left pane, expand the Windows Logs folder by clicking on the tiny arrow and select Awarding from the ensuing list.
![]()
3. First, save the electric current result log past clicking on Save All Events Every bit… on the right pane (past default the file will be saved in .evtx format, save another copy in either .text or .csv format.) and once saved, click on the Clear log… pick. In the ensuing pop-up, click on Clear again.

4. Echo the higher up steps for Security, Setup, and System. Restart the computer subsequently clearing all the consequence logs.
Method five: Disable the Diagnostic Policy Service and delete SRUDB.dat file
Ultimately, if none of the above methods were able to set up Service Host: Diagnostic Policy Service High CPU usage issue, and then you tin cull to disable it altogether. There are four different ways via which you tin disable the service, the simplest ane beingness from the Services application. Along with disabling, nosotros will also exist deleting the SRUDB.dat file which stores all kinds of information regarding the computer (application battery usage, bytes written and read from the hard bulldoze by applications, diagnosis, etc.). The file is created and modified by the diagnostic policy service every few seconds which leads to high disk usage.
1. Blazon services.msc in the Run command box and click on OK to open the Services application. (There are 8 Ways to Open Windows Services Manager then experience free to make your ain option.)

ii. Make certain all the services are sorted alphabetically (click on the Proper name column header to do so) and wait for the Diagnostic Policy Service thenright-click and select Properties.

three. Under the General Tab, click on the Stop button to terminate the service.
4. Now, expand the Startup type drib-downwards menu and select Disabled.

five. Click on the Apply push button to save the changes and then on OK to close the Properties window.

6. Adjacent, double-click on the File Explorer shortcut icon on your desktop to open the same and head down the following accost:
C:\WINDOWS\System32\sru
7. Find the SRUDB.dat file, right-click on it, and select Delete. Confirm any pop-ups that may announced.

If you weren't successful in disabling the Diagnostic Policy Service from the Services Manager application, attempt one of the other three methods.
i. From System Configuration:Open up System Configuration > Services tab > Uncheck/untick the Diagnostic Policy Service.

ii. From Registry Editor: Open up Registry Editor and Caput down to:
Computer\HKEY_LOCAL_MACHINE\Organisation\CurrentControlSet\Services\DPS
3. Double-click on Beginning in the right pane then Change Value Data to 4.

4.Restart the computer and Windows volition automatically recreate the SRDUB.dat file. The Diagnostic Policy Service should no longer exist agile and therefore, causing whatever performance bug.
Recommended:
- Set Service Host: Local System (svchost.exe) High CPU and Disk Usage
- Fix Loftier CPU Usage past Service Host: Local Organization
- How to Repair or Fix Corrupted Hard Drive Using CMD?
- Fix Windows Audio Device Graph Isolation loftier CPU usage
We hope this guide was helpful and yous were able to gear up Service Host: Diagnostic Policy Service Loftier CPU usage on Windows 10 computer. A few things you can attempt to forestall the issue from occurring again in the futurity are updating all computer drivers and performing regular antivirus scans. Yous should also uninstall tertiary-party applications that have served their purpose and aren't required anymore. For any assistance regarding the Diagnostic Policy Service, connect with the states in the comments department beneath.
Source: https://techcult.com/fix-service-host-diagnostic-policy-service-high-cpu/
Posted by: ramseythreake86.blogspot.com
0 Response to "How To Turn On Diagnostics Policy Service Windows 10"
Post a Comment